Learn how to fix a basement leak from the inside with sealants, waterproofing, and drainage tips to stop water intrusion and protect your home from future damage.
Monday, November 24th 2025, 10:01 AM EST by Advertising Content
Simple Steps to Repair Basement Leaks From the Inside and Stop Future Water Damage
Troutville, United States - November 24, 2025 /Seal-tite Basement Waterproofing/
You’ve spotted a damp patch in your basement, and you’re worried it’s a leak. Before you panic, remember it’s a problem that you can tackle from the inside. By correctly identifying the source, using the right tools, and applying a few basic strategies, you’ll have your basement dry and leak-free in no time. But how can you ensure that your repairs hold up against future water intrusion? Stay with me, and we’ll explore the essential steps to not just fixing that pesky leak, but also to creating a lasting, waterproof haven in your basement.
Key Takeaways
Identify the source of the leak, checking for signs like darkened areas, peeling paint, and mold growth.
Prepare for repair by installing moisture barriers and a robust basement drainage system, and clean the work area.
Use tools such as a utility knife, caulking gun, and a moisture meter, and materials like waterproofing sealant and polyurethane foam injection kit.
Seal cracks and holes using filler materials like epoxy or polyurethane, and apply waterproofing products according to instructions.
Invest in long-term prevention strategies such as regular inspections, maintaining humidity levels below 50%, and scheduling periodic professional assessments.
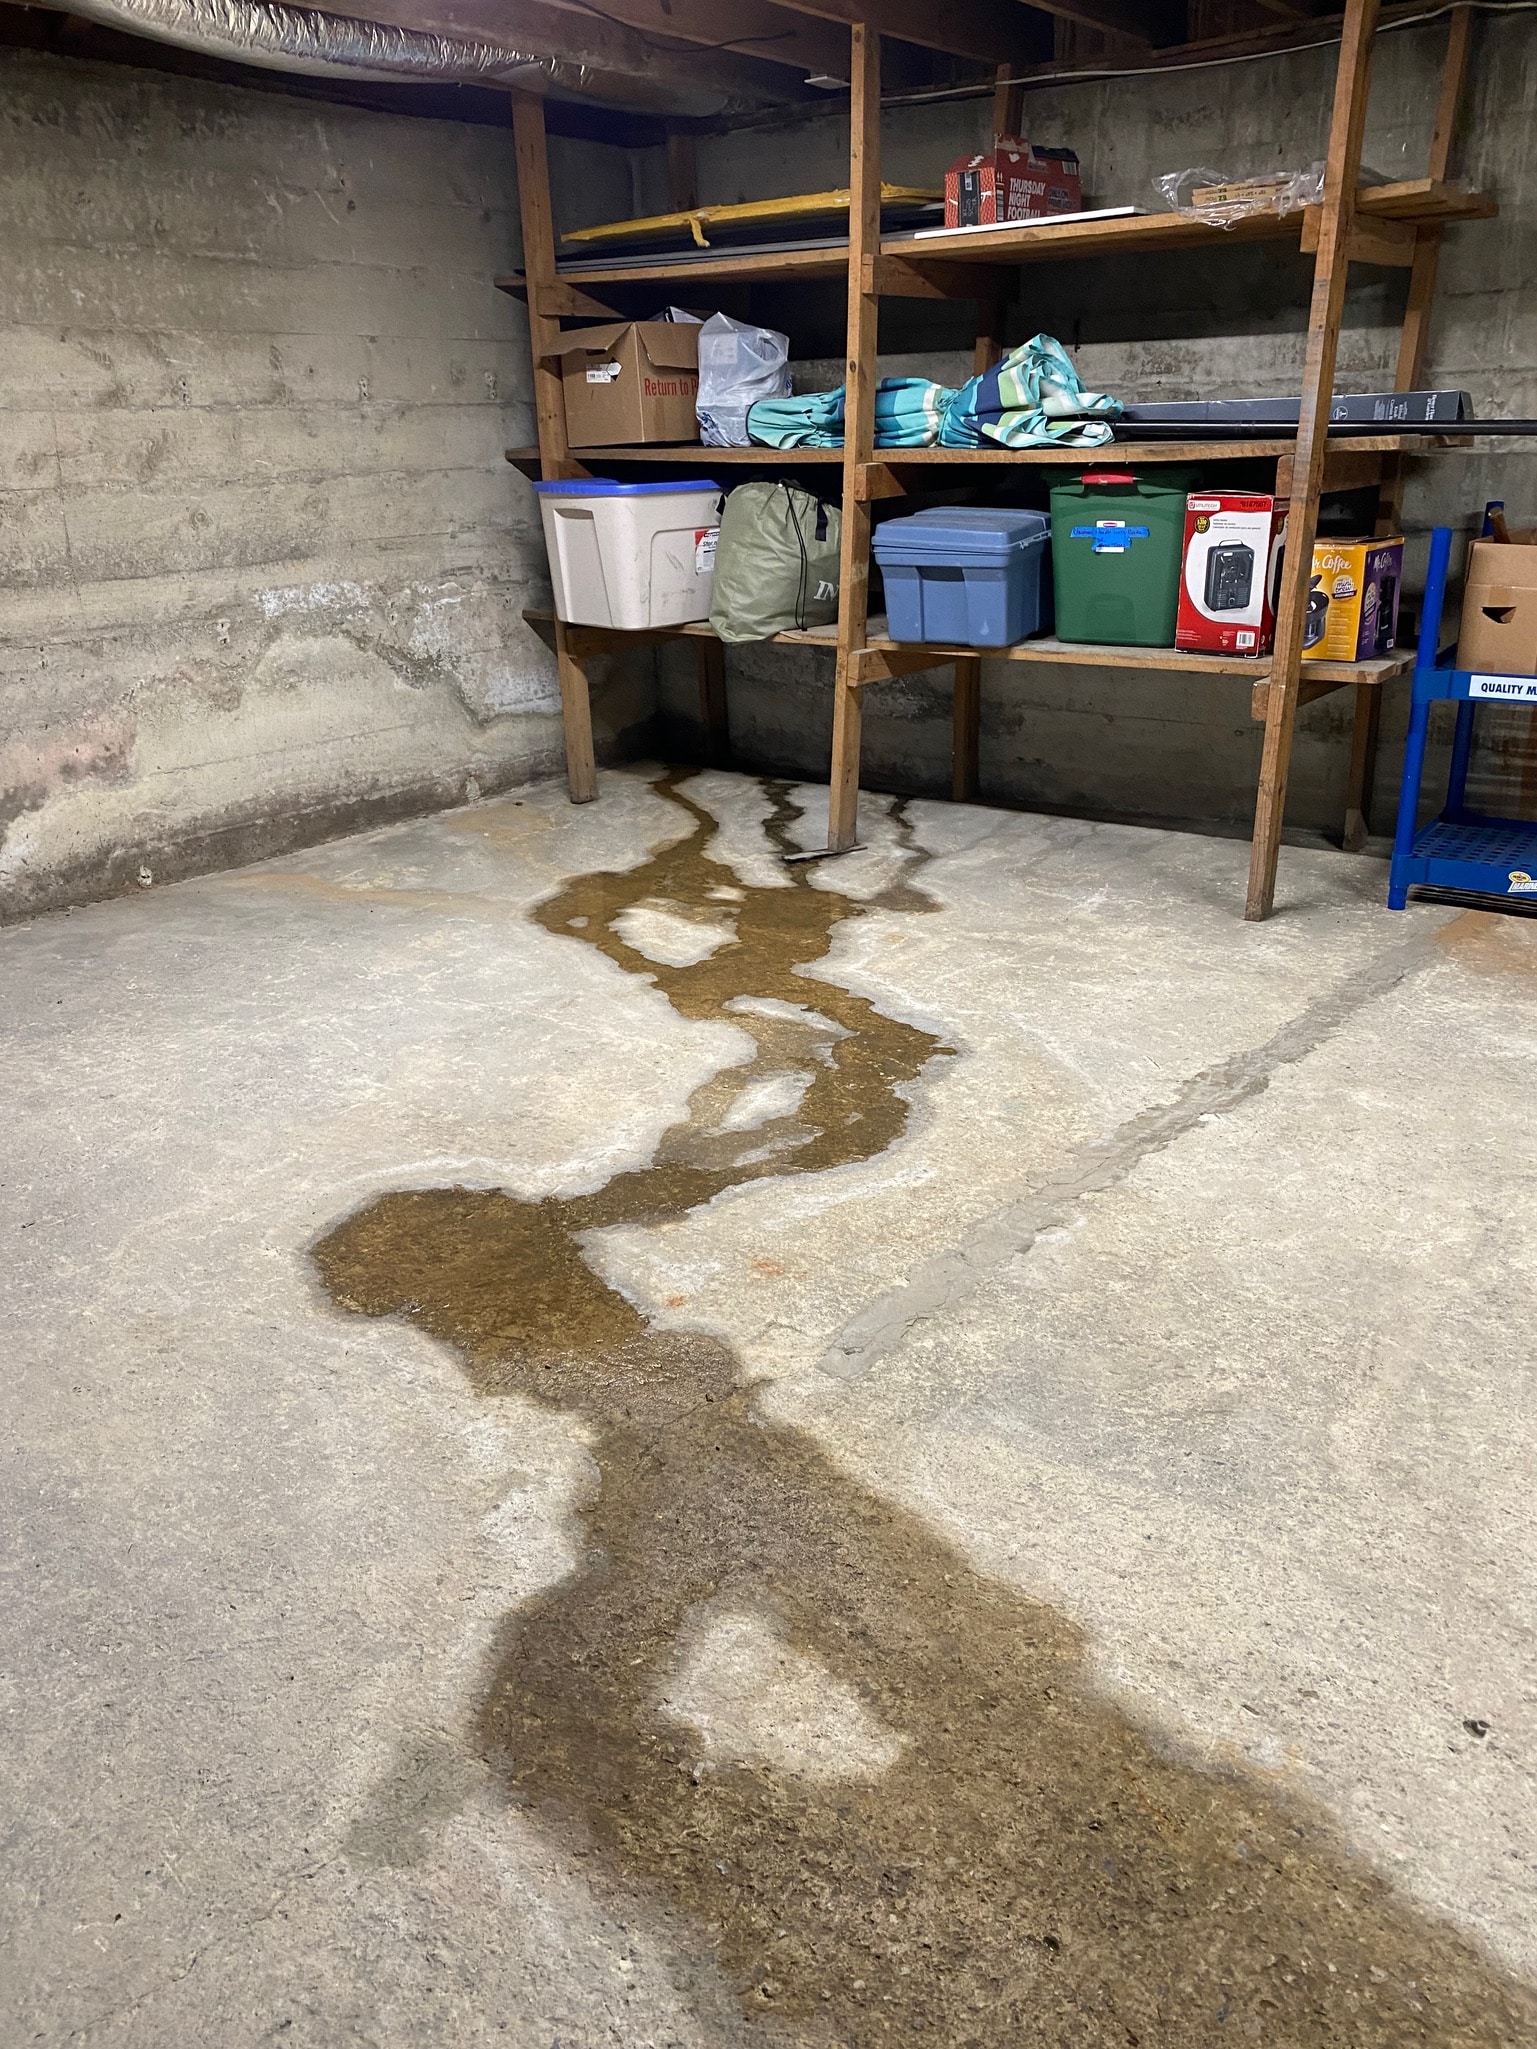
Identifying the Source of the Leak
Where could that pesky basement leak be coming from? You’re not alone in asking this. Identifying leak causes can be a daunting task, especially when there are numerous potential moisture sources.
First, let’s look at the outside. It’s possible that rainwater or melting snow is seeping into your basement from the exterior. Check for poor landscaping that might direct water towards your house, or for a faulty gutter system that’s allowing water to pool around your home’s foundation.
But what if the problem is inside? Your basement’s moisture sources could be internal, like condensation from your heating or cooling systems, or leaks from plumbing lines. You should be especially suspicious if you notice damp spots near pipes or appliances that use water.
Don’t forget about the possibility of groundwater. If your home is located in a low-lying area or near a body of water, your basement might be under constant pressure from water trying to get in from below.
Tools and Materials Needed
Before you can get started on fixing your basement leak, let’s get you equipped with the right tools and materials.
We’ll cover everything from the essential leak repair tools to the necessary repair materials.
Essential Leak Repair Tools
Although a basement leak may seem daunting to fix, having the correct tools and materials can make the process much easier. It’s critical you have great leak detection gear, and tools to install moisture barriers.
Here’s a simple table highlighting essential tools:
Tool
Use
Why It’s Essential
Moisture Meter
Detects moisture levels
Helps in leak detection and verifying dryness post-repair
Utility Knife
Cuts materials
Useful for cutting moisture barriers and other materials
Caulking Gun
Applies sealant
Critical for sealing cracks and holes
Hammer Drill
Drills into concrete
Necessary for installing moisture barriers on walls
Wet Vac
Cleans up water
Helps in removing water from the leak area
These tools will not only help you detect leaks but also assist in repairing them. Remember, it’s not just about stopping the water; it’s about creating a barrier that prevents moisture from seeping in again. With the right tools in hand, you’re well-prepared to tackle that pesky basement leak head-on. It can be a challenging task, but you’ve got this!
Required Repair Materials
Now that you’re equipped with the necessary tools, let’s tackle the materials you’ll need for fixing that basement leak. Your primary repair materials will be waterproofing sealant and a polyurethane foam injection kit. These work to seal any cracks and prevent future leaks.
Waterproofing sealant is a must-have. It’s a thick, paste-like substance that you’ll use to cover cracks and holes. It forms a waterproof barrier that stops water from seeping in. The cost is minimal, making it a cost-effective option for your repair project.
The polyurethane foam injection kit is a bit pricier, but it’s worth the investment. It’s used to fill in the cracks from the inside, creating a solid, waterproof barrier. The foam expands on contact with water, creating a tight seal that prevents leaks. It’s an essential component of your repair materials list.
Also, consider buying some cement mix. It’s handy if you need to patch larger holes or areas of damage. Cost considerations come into play here as well. Cement is relatively inexpensive and can save you from bigger headaches down the line.
Safety Precautions for Repairs
In the thick of repairing a basement leak, your safety should never be an afterthought.
It’s essential to equip yourself with the right protective gear. Start with a good-quality hard hat to protect your head from any falling debris. Wear sturdy gloves to guard your hands against sharp tools or rough surfaces. Don’t forget safety goggles. They’re crucial to shield your eyes from dust or any flying particles. Also, wear steel-toed boots to protect your feet and give you a firm grip on slippery surfaces.
Now, let’s talk about emergency procedures. Before you start the job, familiarize yourself with the location of the nearest first-aid kit.
It’s also good to keep your phone within reach, so you can call for help if needed. Furthermore, ensure you’re aware of the main power and water shut-off points. If anything goes wrong, you’ll need to act quickly.
In essence, it’s not just about fixing the leak. It’s about doing it safely.
Preparing Your Basement for Repair
Before you begin repairing your basement’s leak, it’s crucial to properly prepare the area. Prepping the space ensures the repair job is more effective and lasts longer.
Your first task should be to install a robust basement drainage system. This step is critical to divert any water away from your house, reducing the likelihood of leaks reoccurring.
Next, consider implementing moisture barriers. These barriers can be installed on your basement walls and floor to prevent moisture from seeping into your basement. They’ll provide an extra layer of protection against leaks and dampness.
Finally, clear the area where you’ll be working. This includes moving any furniture or items that might obstruct your work, and also cleaning the surfaces to ensure they’re free from dirt and dust. A clean, unobstructed workspace makes the repair process smoother and faster.
To recap, here’s what you need to do:
Install a basement drainage system.
Implement moisture barriers.
Clear and clean the work area.
Once you’ve completed these steps, you’ll be ready to tackle the problem head-on. Remember, a well-prepared basement is the first step towards a successful repair.
Sealing Cracks and Holes
With your basement prepped and ready, let’s turn our attention to the task of sealing cracks and holes. This step is crucial, as it prevents further damage from crack expansion and strengthens your defenses against future leaks.
Start by inspecting your basement walls thoroughly for any cracks or holes. Small ones might be hard to spot but can cause big problems if they’re not addressed.
Once you’ve identified these problem areas, you’ll need a quality filler material. You can use epoxy or polyurethane, both are great for handling crack expansion and provide hole reinforcement.
Clean the area around the crack or hole before you start the filling process. This ensures a better adhesion of the filler to the wall.
Then, carefully apply the filler, making sure to fill the entire depth of the crack or hole. You’ll want to smooth it out so it’s level with the wall surface.
Waterproofing Your Basement Walls
Now that you’ve sealed any cracks and holes, it’s time to waterproof your basement walls.
First, you’ll need to identify where the leaks are coming from.
Then, we’ll guide you in choosing the right waterproofing products and walk you through the application process.
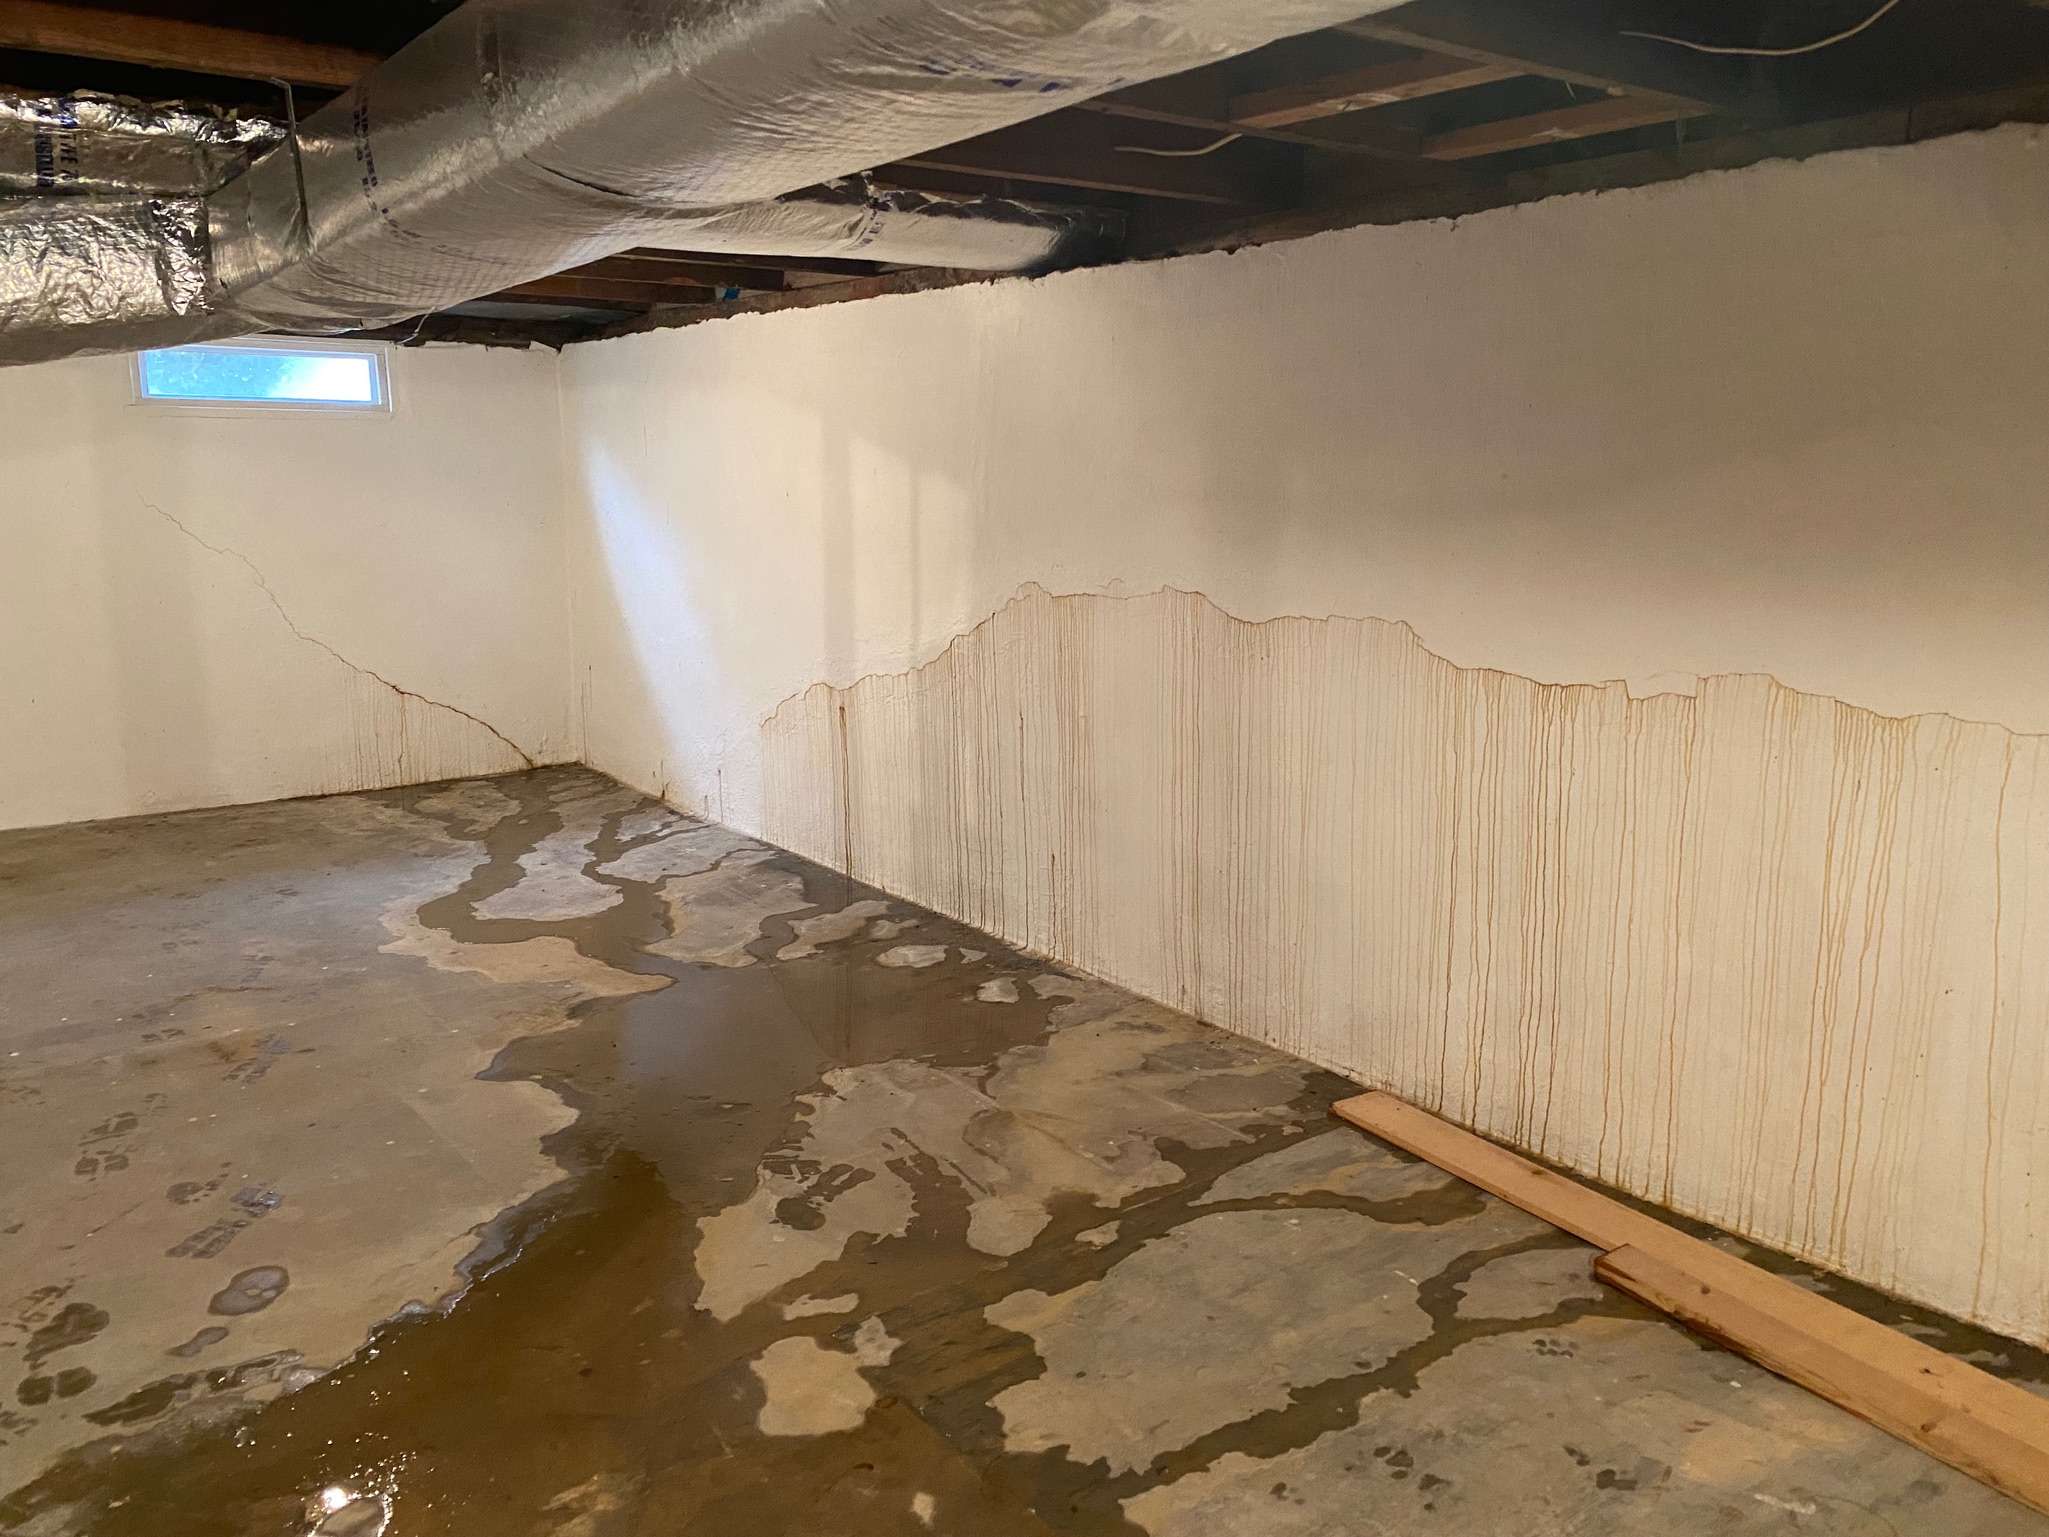
Identifying Basement Wall Leaks
It’s crucial to correctly identify leaks in your basement walls. This is the first step in addressing and fixing the issue.
You’ll need to familiarize yourself with common leak patterns and possible moisture sources. Remember, water can travel, so the source of the leak may not be right where you see the water.
Look for darkened areas on the walls or floors, peeling paint, or mold growth. These are signs of persistent moisture. You’ll also want to check for cracks in your walls or floors as these are common entry points for water.
Here are some steps to help you identify leaks:
Determine the leak patterns: Look for areas where the water seems to be coming from and the path it’s taking. This can give you clues about the source.
Identify possible moisture sources: This could be anything from condensation on pipes to groundwater seeping in through cracks.
Inspect after a rainstorm: This is when you’re most likely to spot a leak. If there’s a problem, water will be more evident.
Choosing Waterproofing Products
Once you’ve pinpointed any leaks in your basement walls, your next step is to select the right waterproofing products. The market is awash with a variety of options, but choosing the best fit for your needs can be a bit daunting.
Waterproofing membranes and different sealant types are among the most popular solutions. Waterproofing membranes are thin layers of watertight material laid over the surface to prevent water from passing through. They’re often made of rubber, plastic, or coated-fabric materials, and are especially effective for keeping out excess moisture.
On the other hand, sealants are substances used to block the passage of fluids through the surface or joints or openings in materials. There’s a wide range of sealant types, including acrylic, silicone, and polyurethane. Each has its unique properties and uses.
For instance, silicone sealants are excellent for high-humidity areas and offer excellent temperature resistance, while polyurethane sealants are known for their high flexibility and durability.
Consider your basement’s specific needs and conditions when choosing between waterproofing membranes and sealants. Do your research and reach out to experts if necessary to ensure your choice will effectively keep your basement dry and leak-free.
Application Process Simplified
Diving into the application process, you’ll first need to prepare your basement walls for waterproofing. Clear any debris off your walls and ensure they’re dry. This initial step promotes better adhesion of the waterproofing product.
Next, consider your sealing methods. There’s a myriad of options, and you’ll need to choose the one that suits your situation best. Sealing is crucial in the waterproofing process as it prevents water from seeping through the walls.
Here’s a simplified guide to the application:
Apply the first coat of your chosen waterproofing product on the wall. Let it dry.
Apply a second coat to ensure total coverage.
After the product has dried, test its effectiveness by spraying a bit of water on the wall.
Remember, your goal is to create a barrier that water can’t penetrate.
Lastly, don’t forget about interior drainage. If water does find its way in, you’ll want it to have an escape route. This could be a drain installed at the base of the walls or a sump pump system.
There you have it. With careful application and the right products, you can effectively waterproof your basement walls.
Maintaining a Dry Basement
Regularly inspecting your basement for leaks is a crucial step in maintaining a dry basement. It’s not just about dealing with leaks after they’ve occurred, it’s about preventing them from happening in the first place.
The secret lies in the correct balance of basement ventilation and humidity control.
Ventilation is key. Ensure you’ve got enough air flowing through your basement. If it’s poorly ventilated, it can encourage damp and mold growth. Consider investing in a good-quality dehumidifier or installing a ventilation system if necessary. They’ll help regulate the air and prevent excessive moisture buildup.
Humidity control is another major player in maintaining a dry basement. You should aim to keep your basement’s humidity level below 50%. Too much humidity can lead to condensation, which, in turn, can cause water damage over time.
A hygrometer can help monitor your basement’s humidity levels accurately.
Frequently Asked Questions
What Are the Potential Health Risks Associated With a Leaking Basement?
You’re facing potential health risks with a leaking basement.
Continuous exposure to moisture can lead to mold growth, which is harmful to your health. Mold spores can cause allergies, respiratory issues, and even skin irritation.
Moreover, water damage can ruin your belongings, create structural issues and attract pests.
Thus, it’s crucial to focus on mold prevention and promptly address water damage to ensure you’re maintaining a safe and healthy environment.
How Much Does a Professional Basement Leak Repair Generally Cost?
You’re probably wondering about the cost of professional basement leak repair.
It varies based on the severity of the leak and location, typically ranging between $500 to $10,000.
However, you could save money with DIY methods.
You’ll need to invest in waterproofing materials, but it’s often more economical.
How Long Will a Properly Repaired and Sealed Basement Typically Last?
When you’ve properly repaired and sealed your basement, you’re investing in long-term durability.
The lifespan depends greatly on the quality of your repair materials and execution. However, typically, a well-done job can last decades.
It’s not uncommon to see repairs hold up for 20 to 30 years or more.
It’s crucial to maintain your basement regularly to ensure that it stays dry and secure, prolonging the effectiveness of the repair.
What Should I Do if I Suspect Mold Growth Due to the Leak?
If you suspect mold growth, it’s crucial you act promptly.
First, identify the mold. Not all molds are harmful, but some can cause health issues.
After identification, take steps for mold prevention. Dry out the area, ensure good ventilation, and clean thoroughly.
If it’s extensive, you might need professional help.
Can Insurance Cover the Costs of Repairing a Basement Leak?
Yes, your homeowner’s insurance might cover basement leak repair costs, but it depends on your policy.
Not all insurance policies cover water damage, especially if it’s considered a “maintenance issue.”
You’ll need to check your specific policy’s details under ‘leak coverage.’
If it’s unclear, don’t hesitate to call your insurance provider for clarification.
So, you’ve done it! You’ve identified the leak, prepared your basement, sealed the cracks, and waterproofed your walls. Remember, maintaining a dry basement is key to preventing future leaks. Keep your drainage system clean and regularly check for signs of moisture. Don’t be afraid to seal any new cracks that may appear. Now, enjoy your leak-free basement and the peace of mind knowing you’ve taken steps to protect your home from water damage.
Contact Information:
Seal-tite Basement Waterproofing
355 Olde Rte 604 Troutville, VA 24175 United States
Information contained on this page is provided by an independent third-party content provider. Frankly and this Site make no warranties or representations in connection therewith. If you are affiliated with this page and would like it removed please contact [email protected]


 Maintaining a Dry Basement

